How to apply white Metal-Flakes paint – A1108

How to apply white Metal-Flakes paint – A1108

This short article will be devoted to thetechnique of painting a white glitter effect A1108.

Vous avez sûrement déjà vu un véhicule entier peint avec un revêtement scintillant comme des diamants et vous vous demandez comment réaliser un tel effet ?

Map of STARDUST® glitter to download

There are polyester metalflakes that are pure white in color, with a matte or shiny finish. Unfortunately these products have a very low shine and will be incapable of creating the shiny coating like a thousand iridescent diamonds that you project.

There are several options among special effect pigments to achieve such an effect, and we will present them to you here in this weekly blog dedicated to Custom paint.

What glitter to create white glitter paint ?

To produce sufficient reflection of light and to achieve this sparkling effect like diamonds, it is necessary to use a metallized flake, that is to say covered with a microscopic layer of silver, aluminum or metal. However, we all know that metals are colored and usually grayish or silver, making it impossible to achieve a white finish.

Here are 3 solutions that allow you to paint a white metalflakes, on any support. The technique is valid both in the field of wall decoration and on body painting.

Whatever the solution, it will first be necessary to apply a white background

A white wall paint

White body primer or white base paint

Implementation

Preferably, we always apply the glitter with a gun or a flakebuster (dry application on a freshly painted wet background) in order to have a homogeneous application.

In the field of bodywork, we can mix these flakes in varnish, or in HS single-component binder, or even hydro body binder

The mixture, i.e. the dose of glitter in the total weight, depends on the type of glitter.

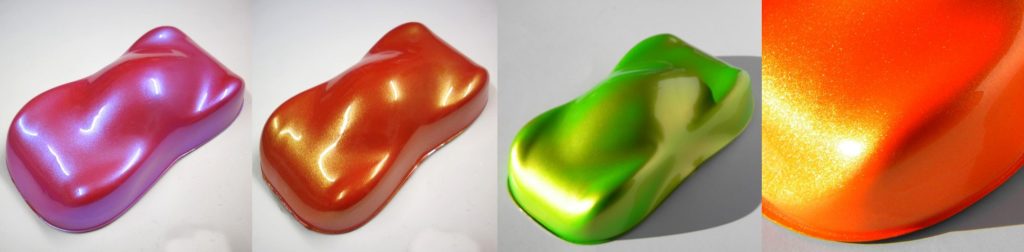
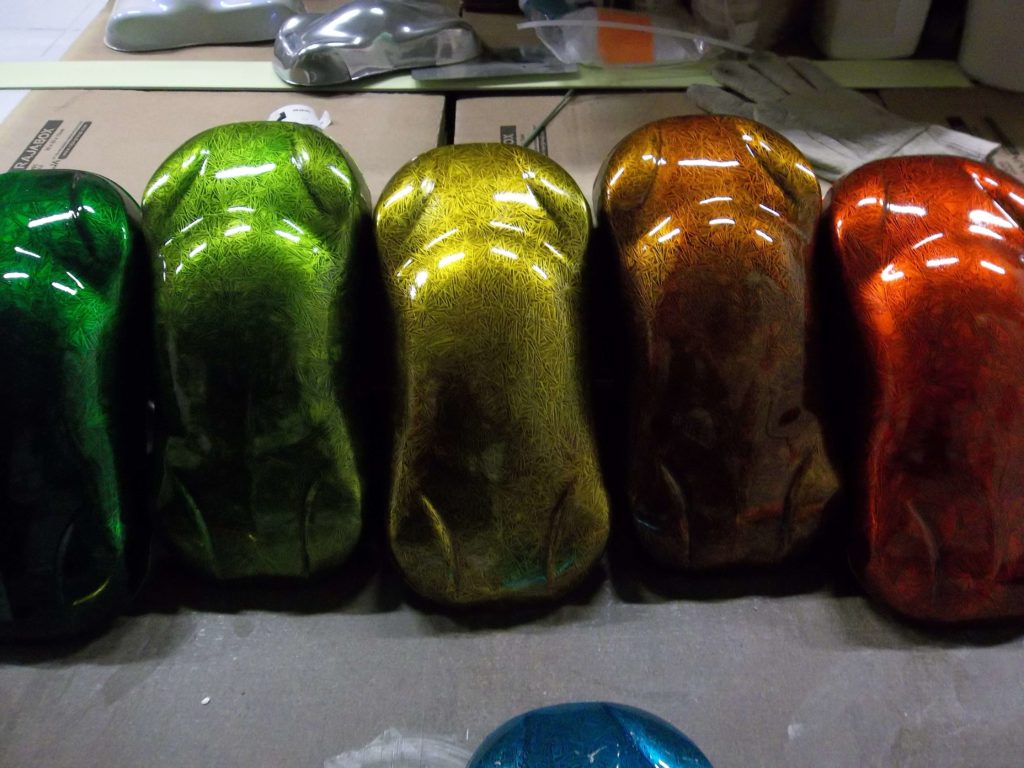
1/ Cosmic metalflakes glitter

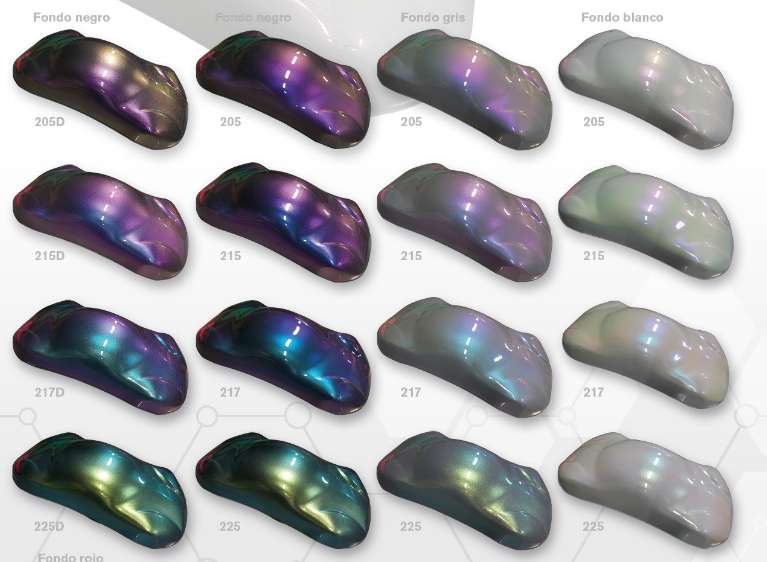
Completely transparent, these glitters can be applied to a white background without changing the background color. They will go almost unnoticed in the absence of direct light. The Cosmic glitter lit by the sun or a lamp, will reflect the light, and not only that, because they will create a colored reflection.

The glitters from the Cosmic range are available in 5 transparent versions creating single, double or triple colored light reflections.

This type of material is perfectly UV resistant and non-yellowing.

Consumption : 25-50g / Liter

Thickness: medium (25-50µm)

flakes-blanc from STARDUSTCOLORS on Vimeo.


2/ Diamond mother-of-pearl

Here is a solution which this time uses very sparkling glass pearls thanks to their composition and their base material. These Diamond pigments available in a wide variety of sizes (100 , 200 , 500, 1000µm) and they are totally white and transparent. The choice of reflection color is given, and white reflection is available.

One of the great advantages of these glass particles is their great finesse and their ease of application. The fine thickness allows for easy and quick varnishing.

Thickness : fine (10-15µm)

Consumption : 10-30g / Litre


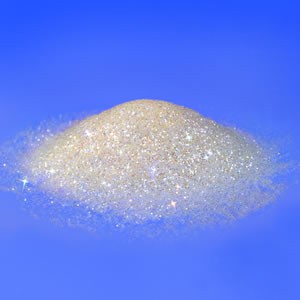
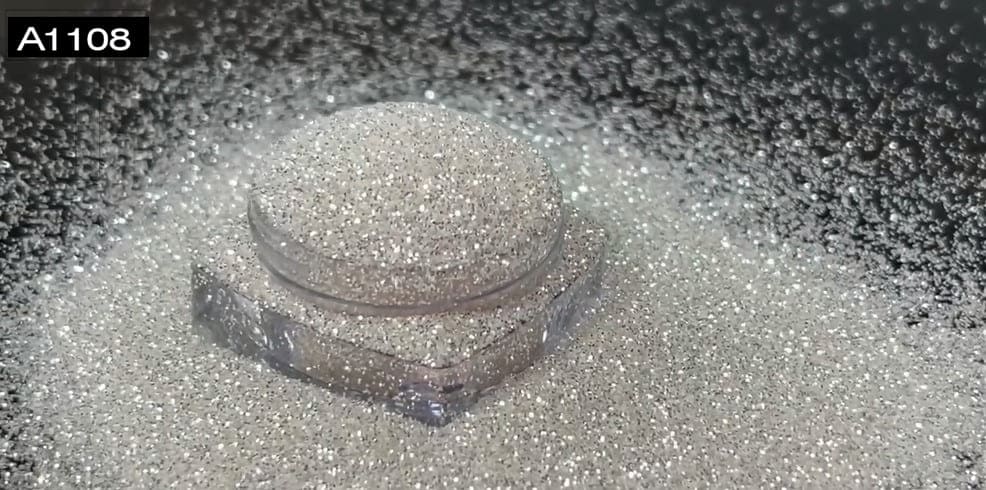
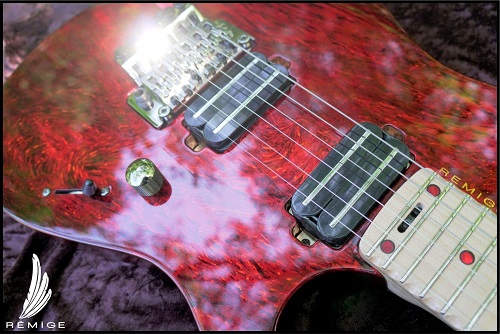
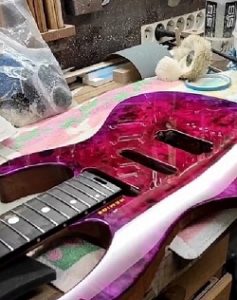
3/ Silver white MetalFlakes A1108

Here is the product that will allow you to create identical surfaces resembling diamonds sparkling in all directions. This way of reflecting light in all angles is characteristic of Metal Flakes: These polyester flakes have a certain thickness, and they overlap a little in all directions, which causes this very particular sparkle which occurs in all directions.

The metalflakes A1108 is the only one in its range that is transparent, so it lets the color of the white background show through. Its secret is that it includes a microscopic layer of silver on its surface, which allows it to reflect light very strongly.

Consumption : 50-80g / Liter

Thickness : medium (50-70µm)

Create an interior or exterior wall painting with white glitter

By mixing A1108 glitter with acrylic binder (provided it is shiny) it is possible to create a magnificent shiny and glittery wall.

“Magma” guitar made with Marblizer and Candy Red paint

“Magma” guitar made with Marblizer and Candy Red paint

Here is a paint job done by the artisan luthier Remige Lutherie.

The Special effect chosen is the marbled effect “Marblizer” which is a relatively simple paint to apply and which gives an impressive visual effect. Its optical effect of depth is amplified when applying a colored varnish “Candy” to its surface

We invite you to discover all the stages of the work carried out with brillo by Remige Design in its video below.

Like every week, we have the pleasure of presenting to you, through an interview, a talented applicator who uses a special effect paint on a particular support.

@stardustpaints Marblizer – peinture marbrée avec candy rouge @remigedee ♬ son original  – stardustcolors

Applying the Marblizer

It is a manual application which is carried out with a sheet of cellophane which is dropped on the surface freshly covered with a thick layer of products. The plastic sheet can be removed and reapplied several times within the 30 second time interval after applying the marble effect, in order to modify and cross the patterns, or to remove material.
The product has a silver appearance and gives maximum contrast with the black background: the silver particles reflect the light, while the black background catches the light.

Applying Candy varnish

With a choice of twenty Candy colors available in the range of Candy Stardust paints, it is possible to color the Marblizer effect in any shade. In general, 3 coats are necessary to obtain intense color and a significant depth effect. If more layers are applied, the damage will continue to darken until it reaches a transparent black color.

Interview and presentation with Remige Lutherie

How many years have you been working as a luthier professionally? What is the name of your brand?

I have been operating since 2016 under the name Rémige Design/Lutherie.

Do you make instruments entirely? from A to Z ?

Yes it’s even my main activity, I work with clients on demand, no project is really alike!

What type of string instruments do you make?

I make electric and acoustic guitars and electric and acoustic basses.

About your customization work on a Guitar with Marblizer effects? What difficulties have you encountered? and what are some tips and advice that you can share with those who would like to try the “Marblizer candy” technique on their guitar?

I first had to discover the product that I didn’t know at all, I had to understand how to use it and what it allowed to do, it dries very quickly it’s not easy to do exactly the desired patterns before the latter freezes, it is also necessary to open the flow of the gun to avoid having only dry extracts which dry even faster.

How did you achieve this special finish on this Morphée Guitar?

Here it is a poplar burl table (a kind of tumor that grows on a tree) tinted with colored inks then varnished, the pattern of the wood being already very spectacular at the start, it takes little to create an exceptional finish

How many instruments leave your workshop each month?

I would rather say each year, an instrument takes on average 3 months to manufacture, it’s around 2/3 instruments per year, obviously these are unique and exceptional works.

Can we have an idea of price for a personalized instrument?

It’s very variable, there isn’t really an upper limit, the higher the range the materials and the violin making the more the price goes up, we can go from around 2000 euros for a very simple instrument with quality equipment, to 6000/7000 € for an instrument like the AFD which is made of exceptional woods and whose violin making is very complex. Inflation doesn’t help matters by pushing up absolutely all prices…

How do you make yourself known to your customers? Where can we see your physical or online store?

I started by making videos on Youtube, after a while and working hard with drastic quality requirements, people who appreciated my work helped me to make myself known, I then settled on Instagram which is ideal for the visually spectacular aspect of my activity; I am now also trying to establish myself on TikTok and evolve with different media, I always demand an atmosphere of sharing and kindness, my workshop is located in Olargues in Herault (34) and my website remigedesign.fr is for the moment only a means of contacting me because I have no commercial activity but only artisanal.

Instagram : remigelutherie

TikTok : RemigeDee

Steps and tips for successful crystallized paint

Steps and tips for successful crystallized paint

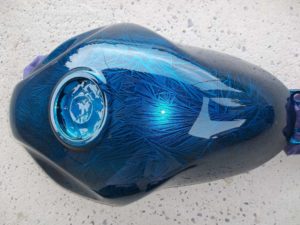
The Crystalizer is a completely exotic product among all existing products in the world of decorative paint or bodywork. It allows you to create a surface with patterns of crystals, and when combined with the Candy technique (transparent colored clearcoat), the Crystalizer produces a real illusion of depth, a sort of crystallized optical illusion effect.

It is possible to use the Crystalizer technique on any surface, any primed material, and on objects or devices of any size : motorcycles, helmets, countertops or tables, joysticks, video console, sculptures…

What exactly is the Crystalizer ?

It is a liquid product, based on alcohol and also containing a salt ; during its evaporation, the product creates a crystallized surface, with slight reliefs formed by crystals.

The product once dry is very delicate, and can be removed with a simple rinse. This decoration can only be fixed with a light coat of black paint*, before the rinsing phase. During cleaning, we just “decapitate the edges of the crystals” and only the deep areas retain the black paint.


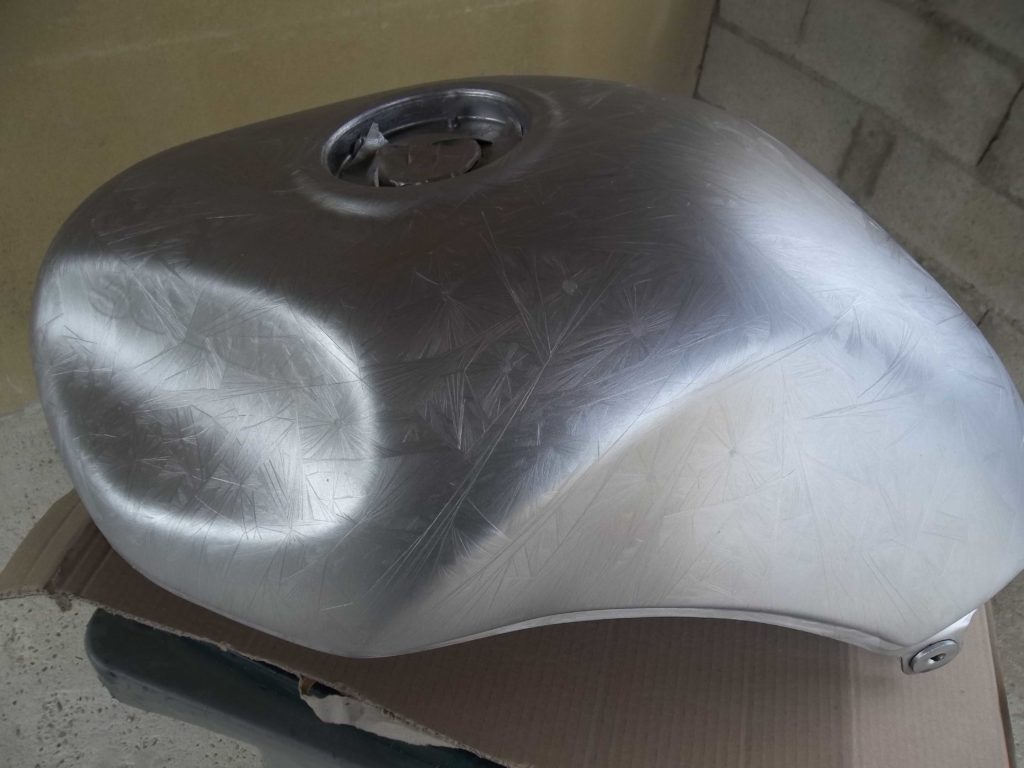
Setup for a Crystalizer effect succeeds

It is possible to use any colored background, as long as this background color will contrast with the shading color.

It is much more interesting to use a reflective paint under the Crystalizer and a colored varnish, in order to reflect the light well and create a luminous and powerful color.

  • Usually aluminum paint is used.

However, you can use mother-of-pearl, Chameleon, chrome, glitter…

Attention ! It is not recommended to apply the Cristalizer directly on the aluminum paint. The latter produces a surface composed of metallic micro flakes which overlap in all directions and it does not form a favorable and ideal surface for the propagation of crystals. It is therefore important to have a varnished bottom, to obtain a smooth and perfect surface.

Of course it is necessary to sand the dry clearcoat with 400 grit paper. This will allow the crystals to adhere well. With a finer sanding, the crystals come off the surface too easily when rinsing.

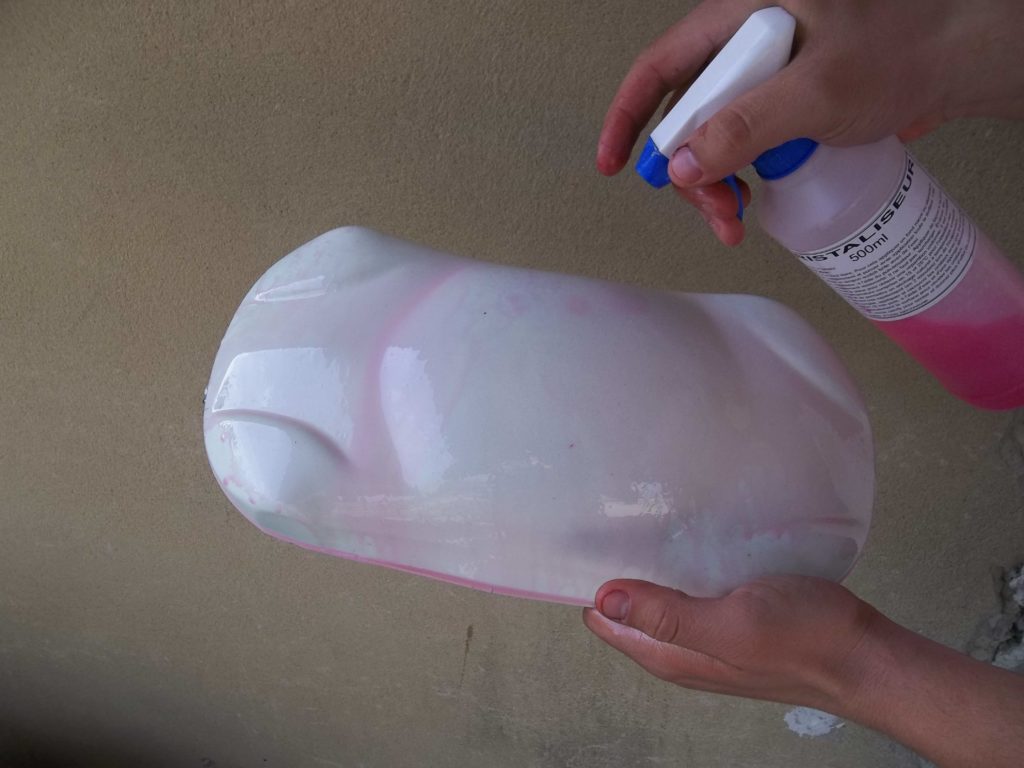
Application and drying
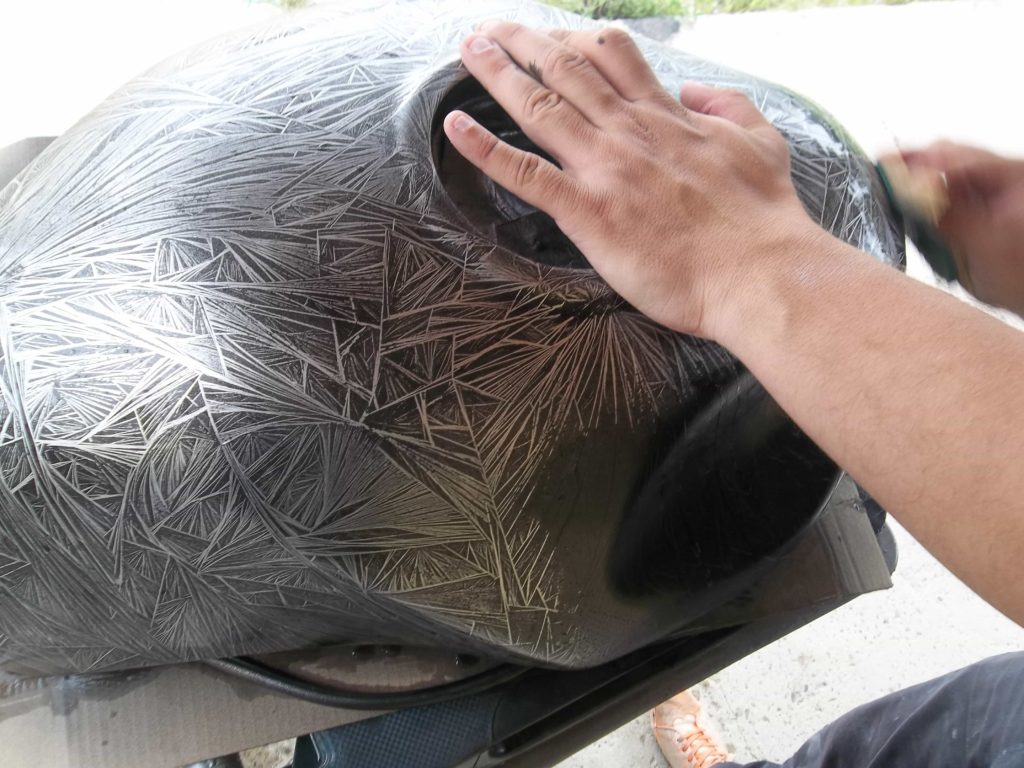
It is not a paint, so it is unnecessary and not recommended to apply this product with a spray gun, making multiple coats and expertly applied !

No, you just have to wet the surface copiously, all at once and as quickly as possible. Especially if the temperature is over 20°, in which case crystallization can develop rapidly.

It should not be disturbed or covered with a second layer.

So once the part has been well covered with the product, the excess can possibly be evacuated, by leaning or shaking the part (if this is possible of course).

On very large surfaces, such as a boat, for example, we will try to apply the right dose, and we will move all around the boat as quickly as possible.

Successful crystallization is done with a dry and warm atmosphere. On the contrary, it is impossible to succeed in the application in a humid and cold atmosphere.

  • You can keep the Crystalizer dry as long as you want without covering it, provided you store the piece in a dry environment.

Shading

It is convenient to use a solvent-based paint.

As for the color, it is necessary to use a solid color, not transparent, not pearly, and sufficiently different from the background color.

It is important to apply the right amount :

If you apply too little paint, the decor will be too light.

If too much paint is applied, rinsing and cleaning will require too much pressure and insistence, and this will always risk washing away the fragile crystals.

  • The Crystalizer does not form any thickness after rinsing because it simply disappears.

It is important not to delay after applying the paint, to clean it with water and an old abrasive sponge. A well-worn dish sponge is ideal !

Beyond 2 or 3 minutes, it will no longer be possible to clean the crystals without applying too much force.

When practicing the technique on large surfaces, it is necessary to act with 2 applicators, one to apply the paint, and another applicator which follows immediately behind to carry out the cleaning without delay.

Once the black crystallized decoration has been cleaned and sanded with an abrasive sponge, it can be varnished or left as it is, for as long as needed.


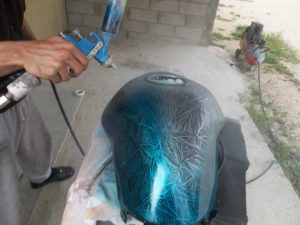
Coloring and clearcoat
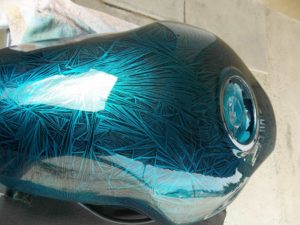
A Candy varnish is used, to choose from among the 24 Candy colours, and depending on the number of coats, the final color will be more or less dark.

2 types of effects are possible : discreet, dark and deep finishes, and finishes with bright and intense colors that will make the crystal decoration very visible.

On a classic crystallized decor in aluminum and black colors, the most vivid colors are Green, Yellow, Orange.

Dark and deep colors are Reds, Violets, Blacks, Browns, Blues.

With the latter, the effect is particularly discreet and is revealed when the sun hits the paint.


Chameleon Interference effects in painting

Chameleon Interference effects in painting

There is a unique collection of 38 references in the Stardust® range, leader and pioneer in Europe in the field of Chameleon colours.

“Chameleon” paints, formerly known as “Beetle” paints, “Flip Flop” paints, or even “Colorshift” paints are pearlescent colors that offer changing color reflections depending on the angle from which they are observed.

Among the chameleon colours, there are a certain number which consist of transparent pearls*.

These chameleon paints then take on the appearance of a whitish liquid, which is in truth almost transparent when applied with an airbrush / spray gun.

*The transparent mother-of-pearl is made of a modern synthetic material imitating natural mica. It is more transparent, more reflective, and less yellowing.

Try changing the background color

Usually applied on a black background, in order to reflect only the light of the mother-of-pearl that composes them*, transparent type chameleon paints can be applied on other background colors.

*the black color reflects little or no light.

We are not talking about a pearly or metallic background color here, because due to certain optical phenomena, a mother-of-pearl on another mother-of-pearl, or a mother-of-pearl on a metal pigment, see their effects cancel out.

We can therefore apply a transparent chameleon color on an opaque colored background, red, yellow, blue, gray… In truth, any color, white included.

The effects are quite interesting and surprising. These are innovative finishes in the field of bodywork or decoration, which are perfectly suitable for indoors or outdoors, thanks to the high resistance of chameleons to UV.

Multicolored interference mother-of-pearl

Interference is an optical phenomenon. In the field of painting, it designates the return of a single color, different from that of the background.

Example : a GREEN background + a RED interfering layer

Stardustcolors classic interference colors include red, green, blue, gold, and purple ; these effect products can be found either in powder form with Crystal interference pearlescent pearls, or in the form of clearcoats.

Transparent chameleons created richer effects in terms of reflections, with double, triple or quadruple colored reflections.

Depending on their purity and composition, they will modify the background color very slightly or not at all.

In truth, the darker the background color, the more the interfering chameleon reflection will dominate the visible appearance returned to the viewer of the painted piece.

Diamond-like interfering chameleons

Classic chameleons are composed of fairly fine particles, the size of which is in the average of the pigments used in the world of automotive paint. These transparent chameleon effects have been transposed onto the large diamond mother-of-pearl, which is made of glass, and which has much more iridescent and glittery properties.

Interference chameleon sequins from the COSMIC range

Here are flakes from the Metal Flakes family, made of polyester, which reproduce the same multicolored effects as chameleons. These COSMIC flakes are perfectly transparent and have an advantage over the large classic opaque Metal Flakes flakes : they are thinner and much easier to varnish.

There is yet another spangle, still polyester-based, and still 200µm in size, which is the transparent holographic spangle.

All these effects mentioned above belong to the family of “Interference effects”.

Advice and tips for painting flying models

Advice and tips for painting flying models

Here are some answers to frequently asked questions by model-makers who try to practice painting on their aircraft models!

Which paint should I choose to keep a miniature airplane lightweight?

When talking about flying models (not the static plastic models), or even real fighter jets or airliners, one central point is the total weight of the various layers of paints. Here are several parameters to consider:

Water-based or solvent-based paints?

First of all, a paint is composed of evaporable material and solid matter (solid content/kg of liquid product) which, after application, become microns thick (weight in g/m²)

Water-based paints have a higher solids content compared to solvent-based paints. Therefore, it’s better to choose solvent-based paints, which form a thinner and lighter final layer, for the same coverage rate.

Here is an example of solvent-based paints for modeling with the Graphic range.

The paint system:

Consider using versatile and efficient products to limit the number of paint steps and passes (primers, paints, topcoats): some products are two-in-one, or even three-in-one systems, as they provide adhesion, and can be used as paint and protective finish.

The thickness:

The wet thickness (from 50 to 150μm) is distinguished from the dry thickness (generally from 10 to 50μm). Apply as little paint as possible. To obtain a thin and well stretched coat, increase the thinning.

airbrush for painting flying models

For multi layer decoration with masking and colours:

Reduce the thickness to a minimum. Dry paint areas can be sanded gently with water to reduce “stairs” effect.

When painting on masked areas, it is recommended not to “load” paint on the edges around the adhesives.

Material and paint compatibility

Models made from wood, composites, polystyrene-type foam or other materials such as EPP or EPO are more resistant to solvents.

In case of doubt, there are two solutions:

  • Isolate the surface with a polyurethane acrylic water-based topcoat

  • Spray 2-3 ultra-thin “flash” layers of solvent-based paint or clear coat on the surface, then wet the surface with the paint without the risk of reaction.

Generally avoid the paints sold for the general public in supermarkets because they create reactions when they are coated with solvent-based paints.

Which tool to use? Spray gun, airbrush or aerosol?

Unquestionably, the mini (0.8 mm) or standard (1.4 mm) spray gun is recommended It allows to apply clear coat, prime or paint accurately.

Airbrush use is restricted for fluid products or thinned products, and for painting masked areas. It is not intended for painting or applying topcoat on an entire model!

As for the spray can, although practical and fast, it poses certain challenges: it doesn’t allow to control the spray or the pressure, and above all, it is not very productive, as it contains mainly gas, and little product!

Should we always apply a primer? If so, what type?

No. A primer should only be applied if necessary, in the following cases:

  • adhesion required on bare material difficult to adhere to > adhesion primer

  • need to fill, smooth, repair the surface > “filler” primer

These are the various types of primers that exist, and they have different functions.

When you have a wooden model already primed, it is quite useless to apply a primer. The same applies for the backgrounds with old sanded paints.

What is the resistance of paints and topcoats to fuels?

Experience shows that commercial and supermarket paints are completely contraindicated because they melt immediately.

As for polyurethane acrylic topcoats, although they are water-based products, they provide a good resistance if they come into contact, accidentally or occasionally, with gasoline, but not more!

For maximum resistance to fuels, a lacquer or solvent-based polyurethane topcoat must be applied.

Read more by checking this discussion on model making and model airplanes.